Friday, January 27, 2012

Large Blinking LED (blue)


I spent yesterday working on ARDX CIRC-01, and creating my own variations.  My husband walked in and said, "I could do that same thing without the Arduino."

Well, of course he could.  He's a electronics maven.  He can design circuits in his sleep, while I'm just wrapping my head around getting an LED to blink.  And at this point I can only do that only by using the Arduino.  However, I know he didn't mean it in an unkind way.  So too, I hope that anyone who reads this, and is far beyond me in knowledge and skill looks at my beginners attempts kindly.  In fact, if you are knowledgeable things in things electronic, I hope reading this will bring you happy memories of your own learning experiences, and maybe a knowing laugh or two.

If you are like me and just learning, I hope that what knowledge I have, the knowledge I gain, or what I'm struggling to learn, gives you confidence in your own attempts to make stuff.  I plan to share it all, even when I fail miserably.

CIRC-01 all wired up

"Blink" sketch (program)
So what did I do with the Arduino last night?  I began by following the instructions for ARDX CIRC-01, Getting Started Large Blinking LED, exactly.   Because I had already uploaded the Blink program the other night, all I had to do was to power on the Arduino and it worked.  It is pretty difficult to screw up the breadboard wiring with the overlay, but I was so grateful no smoke appeared on this first attempt.

After I had enjoyed the large blinking LED for a while, I made a few minor modifications to the program as suggested in the ARDX instructions.  I changed the pin to 12.  I changed the off time to 500 instead of 1000.  Simple stuff, but it was fun to make a little change and see it show work.  Instant positive feedback always helps me to learn.

I also detached the USB and powered it from a 9V power supply I had bought for the purpose.  The Arduino can also be powered by a 9V battery, though I didn't have one handy last night.

The Large Blinking LED in action

I played around with CIRC-01 like this for a while, when I had the idea: What if I had an emergency and had to use my blinking LED to signal an SOS?  So I took the Blink Program and made some very simple modifications.

I had to look up Morse Code to make sure that I got the timing right. The Morse Code is based on units of time.  A dot is 1 unit.  A dash is 3 units.  The gap between dots and dashes is 1 unit. The gap between letters is 3 units.  Finally, the space between words is 7 units.

I made my unit 300, or in the case of Arduino programming, that equals 300 milliseconds.  You can program this sketch yourself, but if you want to use this very simple modification I made to Blink, feel free to cut and paste. Using the CIRC-01 experiment, you too can make your own Arduino blinking LED SOS signal, because you never know when you will have an emergency.


/* SOS Blink
 * Turns on an LED on and off to signal an SOS in
 * Morse Code repeatedly.
 * based on Blink
 * 1 June 2005 By David Cuartielles
 * http://arduino.cc/en/Tutorial/Blink
 * based on an orginal by H. Barragan for the Wiring i/o board
 * modified from Blink 26 Jan 2012 by Gail Allinson 
 * do not use in demonstration situation where SOS blinking 
 * could be confused with a real emergency situation.
 */
int ledPin = 13; // LED connected to digital pin 13

// The setup() method runs once, when the sketch starts
void setup() { // initialize the digital pin as an output:

  pinMode(ledPin, OUTPUT); 
}
// the loop() method runs over and over again,
// as long as the Arduino has power

void loop() {
  digitalWrite(ledPin, HIGH); // set the LED on
  delay(300); // begin S dot
  digitalWrite(ledPin, LOW); // set the LED off
  delay(300); // gap
  digitalWrite(ledPin, HIGH); // set the LED on
  delay(300); // dot
  digitalWrite(ledPin, LOW); // set the LED off
  delay(300); // gap
  digitalWrite(ledPin, HIGH); // set the LED on
  delay(300); // dot
  digitalWrite(ledPin, LOW); // set the LED off
  delay(900); // gap between letter
  digitalWrite(ledPin, HIGH); // set the LED on
  delay(900); // begin O dash
  digitalWrite(ledPin, LOW); // set the LED off
  delay(300); // gap
  digitalWrite(ledPin, HIGH); // set the LED on
  delay(900); // dash
  digitalWrite(ledPin, LOW); // set the LED off
  delay(300); // gap
  digitalWrite(ledPin, HIGH); // set the LED on
  delay(900); // dash
  digitalWrite(ledPin, LOW); // set the LED off
  delay(900); // gap between letter
  digitalWrite(ledPin, HIGH); // set the LED on
  delay(300); // begin S dot
  digitalWrite(ledPin, LOW); // set the LED off
  delay(300); // gap
  digitalWrite(ledPin, HIGH); // set the LED on
  delay(300); // dot
  digitalWrite(ledPin, LOW); // set the LED off
  delay(300); // gap
  digitalWrite(ledPin, HIGH); // set the LED on
  delay(300); // dot
  digitalWrite(ledPin, LOW); // set the LED off
  delay(2100); // gap between word
}

Boxing Day

The box my ARDX kit came was a little beat up after its trip from New York to me.  I peeled off the labels and tape.  That made it look even worse.

Its a nice size box so I covered it with some wood-grain self-stick vinyl (aka Contact Paper, but this is a generic brand) I had laying around.  It think it came out pretty nice.


before: tape peeled off and flattened
after: love that fake wood look

Wednesday, January 25, 2012

We Have Lift-off!

My Arduino Experimentation Kit (ARDX) arrived late yesterday.  (Thanks to the Adafruit folks for shipping it so quickly.)  I opened up the box and took a quick look last night, but I didn't get a good look at things until today.  I finally got to work on it this evening.

The first thing I did was to unbox the Arduino.  It was beautifully packaged in a small, sealed box.  It included an information sheet and a sheet of nifty Arduino stickers.  The experience reminded me of unboxing an iPhone, only smaller and less expensive.  Someone put a lot of time and thought into the Arduino packaging.  I'm guessing even more thought has gone into the Arduino itself.  Mine is the latest Arduino to date, the UNO R3.

some of the components from my ARDX kit in a bowl
tools, Arduino in box, base and breadboard
Having worked with electronic kits before, the next thing I did after the unboxing was to print out the parts list from the online catalog and to inventory what I had received.  It is not that I think anyone would purposely not include something, but missing parts can happen.  If you don't inventory an electronics kit immediately upon opening the parts bag(s), you will never know if you got the all the parts, or if you lost a part if one is missing later on.

  The inventory was also a great chance to identify the components in this particular kit.  Not all parts look the same even if they work the same.  For example, the potentiometer (variable resistor) in this kit looked a little different than the ones I've worked with in the past.  It was easier to acquaint myself with it this way than to try to figure it out later.

I also had to assemble the breadboard and the Arduino on its base, and I still hadn't found the hardware for that.  I found the nuts and bolts in the bag with the electronic components.

All the parts were there along with an extra part. I did have one capacitor that I did not find on the parts list.  Since I haven't read the whole manual yet, I have a feeling I will need it. I put all the small electronic parts back into their handy zip-lock, anti-static bag.

After the parts inventory, I gathered my tools to assemble the Arduino and breadboard on its base.  It was a pretty simple job, but it helped to have a small screwdriver, a magnifying glass, and small wire cutters. Like the inventory, experience has taught me it is better to gather the tool I think I will need before I start.  I'm fortunate that I have these things on hand. 

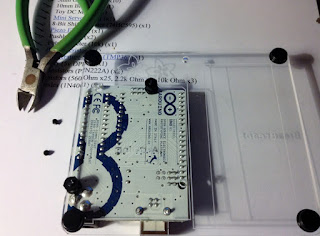
back of Arduino as seen through base w/ clipped bolts
Finally, I was ready to assemble the base.   I pulled the backing off of the acrylic base.  Then I took the Arduino out of its box and lined it up with the holes in the base as was pictured in the manual.  I put the bolts through the holes as shown in the picture.  The first problem was that the bolt head came too close to a header on the printed circuit board so that the bolt would not sit straight in one of the holes.  That was easily solved by using different holes.  I secured the Arduino to the base and put the stick-on feet on the bottom.  It was at this point I ran into my second problem.  The bolts were too long and did not let the base sit flat on my desk.  Fortunately, a few quick nips with the wire cutters to shorten the bolts took care of this problem.  (Update:  I later downloaded the ARDX manual from the Adafruit site as opposed to the printed manual supplied with the kit.  The downloaded manual showed the bolts going in from the bottom up as opposed to the top down, which would solve the length problem.  It also showed the bolts going though the holes I ultimately used instead of the holes shown in the printed manual.)

With the Arduino bolted in place, the next step was to put the breadboard on the base.  The breadboard came with a piece of double sticky foam tape that fully covered its back.  The only trick to it was that there was only one chance to get it right.  It stuck very firmly!

assembled Arduino and breadboard on base
When all was assembled,  it was time to get out the inlcuded USB cable and plug the Arduino into my computer.  The power light came on as expected.

I had already installed the Arduino software on my computer.  So I followed the "Getting Started" instructions for Windows.  I have Windows 7 x64.  The hardware (the Arduino) was pretty easy to install, but it was a little different than described.  Instead of the device showing up as a COM Device, it showed up in Device Manager as an Unknown Device.  I installed the Arduino driver to the Unknown Device and suddenly, it appeared as a COM Device identified as Arduino UNO  on COM4 (your port may vary).  Since it was an unsigned driver I also got a big red Windows warning during the installation, but I clicked right through that.  That's to be expected when installing an Open Source driver in Windows.

Arduino plugged into computer via USB
Next, I followed the instructions for the "Blink Example."  It is important to double check that you have the correct COM port selected and that the model of Arduino is correctly identified to the software. The Arduino responded properly to the loaded sketch (that's what an Arduino program is called) and the on-board LED blinked as expected.

So far I haven't done anything difficult, but is is interesting how many little things were different than expected.  Still, nothing was that hard to figure out.  I think that at least some rudimentary knowledge of both computers and electronics is useful even though it is not necessary.

Here is a video of my Arduino in operation:


Friday, January 20, 2012

Ar-du-what's-it?

Up until a few days ago I had never heard of an Arduino.  Even after I "heard" of it, I had actually only read of it.  So I had to mentally run through possible pronunciations. I quickly discovered that it was Italian.  I did a little research; and between what I read on Wikipedia and the official Arduino Forums, my best guess at the pronunciation is:

Arrrr, as in pirate
Dew, as in drop
Ee, as in ee  (not to be confused with EE as in electrical engineer)
and No, as in know

I asked my husband, who designs and teaches electronics for a living, if he had ever heard of something called an Arduino.  He was vaguely familiar with the name.  Then he asked me the big question, "What is it?"

"It's programmable microcontroller used in electronic prototyping," I said with tentative authority.

I clearly was already in over my head because I wasn't sure what prototyping was in this context.  I understood programmable and microcontroller.  Maybe two out of three was not so bad?  I figured that he would know what that meant.  Of course, I was hoping he could tell me what the Ar-du-thing was.  That was not to be.

"But what is it?" he asked once again.

"It's programmable microcontroller used in electronic prototyping," I stated.  This time I tried to sound more sure of myself.

"But what is it?" he asked once again, firmly.

I answered him as I had before.  Clearly, he wasn't satisfied.  I was starting to wonder if he really was the electronics genius that I always thought he was.

Finally, he asked, "What chip does it use?"

I was sitting in front of my computer, so I clicked on a link to the Adafruit catalog listing and gave him the answer he wanted.  "It's an A-T-mega328," I said proudly.

"Atmel," he said with the ease of years of experience. (It actually sounded like "At-meh" to me at the time, but I figured it out, later.)

"Well, I want one for my birthday," not wanting to have to actually try to pronounce the "Ar" word again.

"But your birthday is still months away."

"I know, but I'm hoping I can learn some more electronics with it, or at least remember what I've forgotten; and that's what I will want.  I'm just planning ahead.  The experimentation kit that I want is not in stock right now, anyway."

Wednesday, January 18, 2012

Blue LEDs

There is not much to say about the Arduino, yet.  I ordered it yesterday from Adafruit and it was shipped today.  It should get here in about a week.

In the meantime, I'm thinking about my first visit to WESCON (a now defunct OEM Electronics show) in 1995.  I knew a little less about electronics then than I do now (not that I know that much now).  LEDs were everywhere.  There were so many far eastern manufacturers and so many LEDs.  However, the hands down the stars of the show were the blue LEDs.

analog 12V RGB LED strip with the blue turned on
Fast forward to the present day and everyone has seen blue LEDs.  They are cheap and easy to get, though still not as cheap as red, green and yellow.  But I digress.  In 1995 practical and affordable blue LEDS were something new and awesome.  Not that I knew that.  I had to be told about their newness, the technological achievement, and general goodness.  I only knew that they were shiny, pretty, and cool.

I don't have a picture from that magical day back in the fall of 1995.  I wish I did, but even without a photo I think you can imagine that each booth at WESCON with LEDs was sparklier than the next. The blue LEDs looked like an ocean of lighted sapphires.  I still have my WESCON mug, a Mouser backscratcher; and every time I see a blue LED, I remember the magic of that day.

So, I dedicate this blog to those of you who remember a time before blue LEDs, and to those who don't; but especially to those who still think blue LEDs are awesome.