The first thing I did was to unbox the Arduino. It was beautifully packaged in a small, sealed box. It included an information sheet and a sheet of nifty Arduino stickers. The experience reminded me of unboxing an iPhone, only smaller and less expensive. Someone put a lot of time and thought into the Arduino packaging. I'm guessing even more thought has gone into the Arduino itself. Mine is the latest Arduino to date, the UNO R3.
 |
| some of the components from my ARDX kit in a bowl |
 |
| tools, Arduino in box, base and breadboard |
The inventory was also a great chance to identify the components in this particular kit. Not all parts look the same even if they work the same. For example, the potentiometer (variable resistor) in this kit looked a little different than the ones I've worked with in the past. It was easier to acquaint myself with it this way than to try to figure it out later.
I also had to assemble the breadboard and the Arduino on its base, and I still hadn't found the hardware for that. I found the nuts and bolts in the bag with the electronic components.
All the parts were there along with an extra part. I did have one capacitor that I did not find on the parts list. Since I haven't read the whole manual yet, I have a feeling I will need it. I put all the small electronic parts back into their handy zip-lock, anti-static bag.
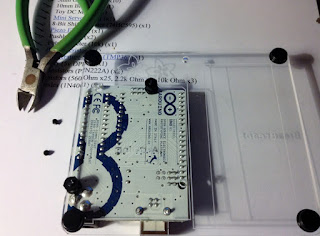
After the parts inventory, I gathered my tools to assemble the Arduino and breadboard on its base. It was a pretty simple job, but it helped to have a small screwdriver, a magnifying glass, and small wire cutters. Like the inventory, experience has taught me it is better to gather the tool I think I will need before I start. I'm fortunate that I have these things on hand.
 |
| back of Arduino as seen through base w/ clipped bolts |
With the Arduino bolted in place, the next step was to put the breadboard on the base. The breadboard came with a piece of double sticky foam tape that fully covered its back. The only trick to it was that there was only one chance to get it right. It stuck very firmly!
 |
| assembled Arduino and breadboard on base |
I had already installed the Arduino software on my computer. So I followed the "Getting Started" instructions for Windows. I have Windows 7 x64. The hardware (the Arduino) was pretty easy to install, but it was a little different than described. Instead of the device showing up as a COM Device, it showed up in Device Manager as an Unknown Device. I installed the Arduino driver to the Unknown Device and suddenly, it appeared as a COM Device identified as Arduino UNO on COM4 (your port may vary). Since it was an unsigned driver I also got a big red Windows warning during the installation, but I clicked right through that. That's to be expected when installing an Open Source driver in Windows.
 |
| Arduino plugged into computer via USB |
So far I haven't done anything difficult, but is is interesting how many little things were different than expected. Still, nothing was that hard to figure out. I think that at least some rudimentary knowledge of both computers and electronics is useful even though it is not necessary.
Here is a video of my Arduino in operation:
No comments:
Post a Comment
All comments are moderated.